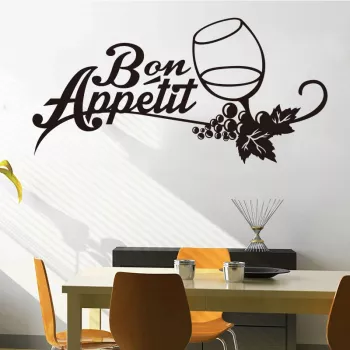
A kitchen can be functional and still feel like a place to linger. Our French Cuisine Wine Glass Wall Decal brings that bistro-style warmth into everyday cooking—simple, elegant, and easy to place where it naturally fits your routine. Add it above a coffee station, near a dining nook, or along an open wall that needs a finishing touch. The result is a cleaner, more intentional look that pairs well with cookware on display, neutral backdrops, and the soft glow of evening meals. For more guidance, see Getty: Resources for Visual Art and Cultural Heritage.
When you want the room to feel “done” but you don’t want to lose counter space, wall decor does the heavy lifting. This French cuisine-inspired design keeps things calm and classic while giving your kitchen a defined focal point. For further reading, see The Museum of Fine Arts, Houston: Home.
If you’re ready to add that touch, start with our French Cuisine Wine Glass Wall Decal – Elegant Vinyl Kitchen Art for an easy update that still feels purposeful.
Placement matters more than size. The best spot is usually where your routine already creates a “moment”—pouring coffee, setting out glasses, or pulling plates for dinner.
Vinyl looks best when it’s applied slowly, on a clean surface, with steady pressure. A little prep upfront helps the edges settle cleanly and stay put through everyday kitchen humidity.
| Situation | What to do | What to avoid |
|---|---|---|
| Routine cleaning | Wipe lightly with a dry or slightly damp microfiber cloth | Abrasive sponges or scrubbing |
| Kitchen residue (light film) | Use a barely damp cloth; dry immediately | Harsh degreasers directly on the decal |
| Newly applied decal | Let it rest before cleaning so edges can settle | Repeated lifting/repositioning once it’s adhered |
| Humid cooking days | Ventilate the kitchen to reduce prolonged condensation | Constant steam exposure right at the decal surface |
For general, material-safe cleaning habits around the home (especially when you’re avoiding harsh chemicals), Good Housekeeping is a solid reference point.
The easiest way to make a single wall element look “designed” is to repeat something already in the room—texture, tone, or shape—without crowding the space.
Light texture usually works, but heavy texture can reduce how much of the vinyl makes full contact with the surface. Clean the wall well and apply firm, even pressure; when possible, choose the flattest section of the wall for the crispest result.
Yes—repositioning is typically easiest early in the application process, before the vinyl is fully pressed down. Using a painter’s tape hinge helps you confirm placement first, so you’re less likely to need repeated lifting.
Use gentle dusting or a lightly damp microfiber cloth, then dry the surface right away. Avoid abrasive scrubbing and harsh cleaners that can stress the edges over time.









Leave a comment