Crystal Ceramic Tile Paste: A Fast Floor Refresh with Self-Adhesive Decoration Stickers
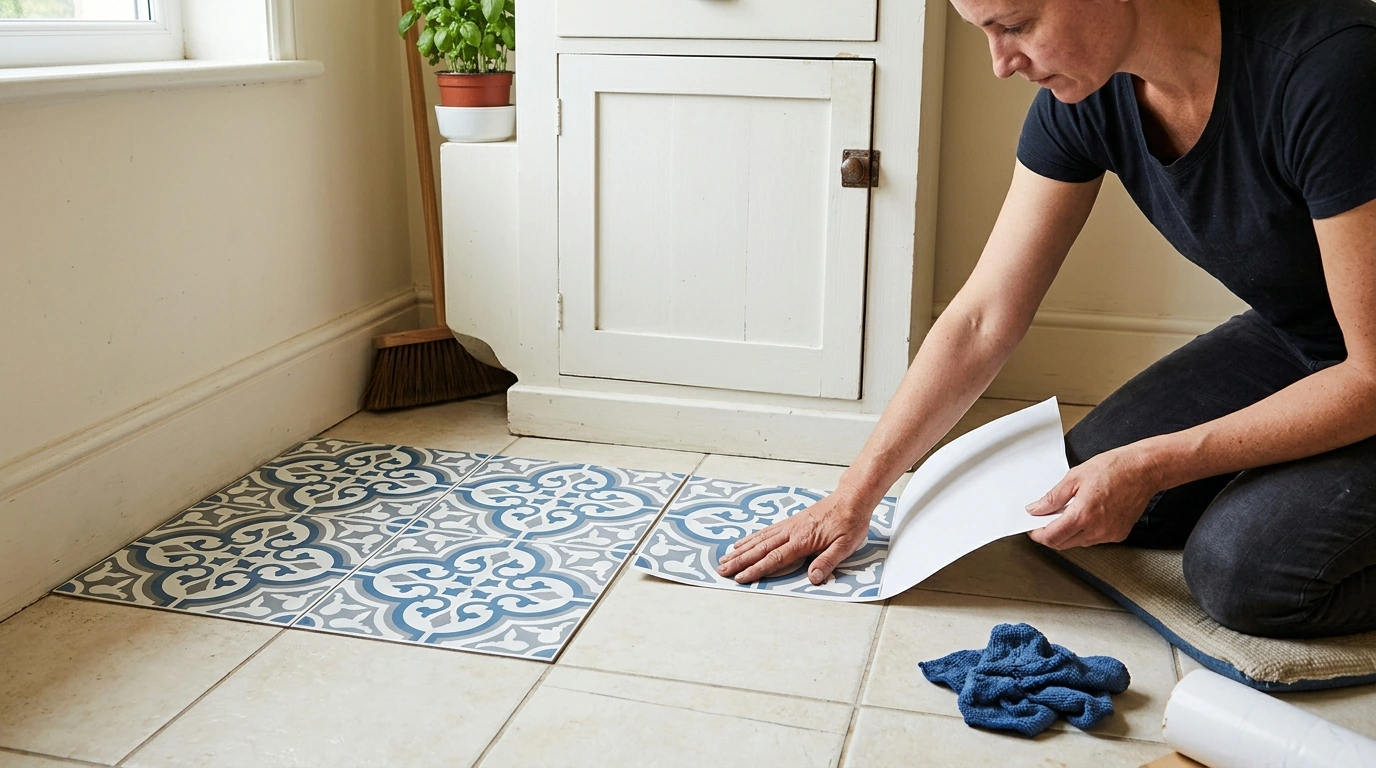
A clean floor sets the tone for the whole room. Our Crystal Ceramic Tile Paste self-adhesive floor decoration stickers are designed for quick upgrades—covering tired-looking tiles, adding pattern, or creating a neat, “finished” look without mixing grout, hauling tools, or committing to a full renovation. If you want a refresh you can plan in an afternoon, we’ll walk you through where they shine, how to prep for strong adhesion, and the simple care habits that help the new look last.
Where These Stickers Make the Biggest Difference
Peel-and-stick floor decor works best when you use it strategically. These are the situations our team sees make the biggest visual impact with the least effort:
- Rental-friendly refresh: Update the look of old tile or plain flooring with minimal mess and easy planning.
- High-visibility zones: Entryways, hallways, laundry areas, mudrooms, and kitchen corners that look worn before the rest of the room does.
- Small projects with high impact: Patchy-looking areas, under a rolling cart, or around a utility nook where replacing tile feels like overkill.
- Pattern control: Create a rug-like zone, border, or checker accent without changing the entire room.
- Temporary seasonal updates: Switch up the feel of a space when hosting, moving, or doing a room-by-room refresh.
If you’re ready to start with the core upgrade, you can use Crystal Ceramic Tile Paste – Self-Adhesive Floor Decoration Stickers as your main surface refresh and build your styling around it.
What to Expect from a Self-Adhesive Tile Paste (The Practical Version)
- It’s an overlay, not a rebuild: You’re covering what’s underneath for a cleaner decorative surface, not repairing subfloor issues.
- Adhesion is everything: Smooth, clean, fully dry floors typically deliver the best hold; rough, dusty, or damp surfaces don’t.
- Edges matter: Neat alignment and firm pressure along seams reduce lifting and help the pattern look intentional.
- Comfort and sound: A thin top layer can slightly change the underfoot feel and may soften the look of small scuffs compared with bare tile.
- Best results come from planning: Measure, dry-lay the layout, and decide where cuts and seams will land before you peel the backing.
Surface Prep That Helps Them Stick (and Stay Put)
Most “peel-and-stick problems” come from prep, not the product. Give the adhesive the best possible chance to bond:
- Clear the area completely: Remove mats, furniture, and anything that could drag across edges during installation.
- Deep-clean first: Remove grease, floor wax, and residue that can block adhesion. Rinse well so no cleaner film is left behind.
- Dry thoroughly: Moisture trapped under an adhesive layer can weaken the bond over time.
- Check for texture: Heavily textured tile, deep grout lines, or crumbling surfaces may show through and reduce contact area.
- Do a small test piece: Apply one sticker in a low-visibility corner to confirm adhesion and finish before committing to the full layout.
- Temperature awareness: Install at a stable indoor temperature so the adhesive isn’t stiff from cold or overly soft from heat.
When you’re choosing cleaning products for prep and ongoing care, it’s worth following general guidance from authoritative sources like the EPA Safer Choice program and the CDC’s cleaning guidance for practical, safer cleaning habits.
A Simple Installation Plan (No Guesswork)
Install is easiest when you treat the first row like the “foundation.” Take your time up front, then move steadily.
Quick Placement Checklist by Room Situation
| Situation |
Layout tip |
Extra step that helps |
| Narrow hallway |
Start from a center line so both sides look balanced |
Prioritize straight seams; trim at edges last |
| Entryway near a door |
Align pattern parallel to the threshold for a tidy look |
Leave a clean edge near the door swing to reduce scuffing |
| Kitchen corner |
Run the first row along the longest visible cabinet line |
Press edges firmly; avoid seams right under rolling traffic |
| Laundry/utility nook |
Minimize tiny slivers by shifting the start point slightly |
Test adhesion if the floor is sealed or very smooth |
Care and Cleaning: Keep the Finish Looking Crisp
Common Fit Questions Before You Order
Easy Styling Ideas That Pair with a Cleaner Floor Look
FAQ
Can self-adhesive floor decoration stickers be used in kitchens and entryways?
Yes—kitchens and entryways are common places to use them, especially for a quick visual upgrade. Prep matters most: make sure the floor is clean and fully dry, and press seams and edges firmly. Heavy grit and frequent water exposure can shorten lifespan, so mats and prompt spill cleanup help.
How do you clean and maintain adhesive floor stickers without lifting the edges?
Sweep or vacuum often, then damp mop with a mild, non-abrasive cleaner as needed. Avoid harsh chemicals and abrasive pads that can catch corners, and dry puddles quickly. It also helps to check seams occasionally and press them down before they become a snag point.
What surfaces should be avoided for peel-and-stick floor stickers?
Avoid dusty or crumbly floors, very rough textures, damp areas, and surfaces with wax or oily residue that blocks adhesion. Deep grout lines can also show through and reduce contact. When you’re unsure, apply a small test piece in a discreet spot first.
Recommended for you







Leave a comment